Proteam UP! The Challenge

Introduction
Humans are made up of around 30 trillion (30,000,000,000,000!) cells, each with their own structure and function. DNA is found inside the nucleus of each cell, packaged into structures called chromosomes. As you will see in Part I: Crack the DNA code, DNA contains the instructions for making proteins.

The Cell is like a Factory
In order to make proteins, it is necessary for messages to be sent to specialised parts of the cell, known as organelles, so that these know how to process and translate information. You can think of a cell as a very complicated factory: everything inside the cell has an important job! There are workers that read the instructions for that day and plan how to do them, other workers that break down the information into smaller tasks, and workers that carry out the individual tasks.

Amino acids are the building blocks for proteins
You might already know that during digestion, proteins are broken down into amino acids. As the name suggests, amino acids are molecules that have an amino group made up from one Nitrogen atom and two Hydrogen atoms (-NH2) and a carboxylic acid group made up of one Carbon atom, two Oxygen atoms, and one Hydrogen atom (-COOH). There are 20 natural amino acids that are the building blocks of proteins.

Polypeptide chain modified from an original image courtesy of: National Human Genome Research Institute (https://www.genome.gov/genetics-glossary/Amino-Acids)
WHAT'S NEXT?
Part I: Crack the DNA code!
So where do proteins come from?
- The DNA (deoxyribonucleic acid) in cells undergoes a process called Transcription that leads to mRNA (messenger ribonucleic acid).
- Then, mRNA is Translated into polypeptides – long chains of amino acids.
- Finally, polypeptides fold to form proteins.
- This process of going from DNA to RNA to proteins is called the "Central Dogma", and it's how our genes are expressed!

"Central Dogma" by Khan Academy. Note: All Khan Academy content is available for free at (www.khanacademy.org)
We've introduced a lot of new concepts here so we've got a short quiz for you to check what you've learned.
https://forms.office.com/r/9G7ADHqjMt
Now let's start the challenge!
Think of this challenge as an escape room – we’ll give you the first DNA hint and you need the right amino acid code to escape!
DNA is formed of two strands. On each strand, there are four nucleobases which repeat like monomers in a polymer.
The four nucleobases are:
-
adenine (A)
-
thymine (T)
-
guanine (G)
-
cytosine (C)

Here, we are going to give you one strand of DNA and your challenge is to find the missing nucleobases in Strand #2!
We did the first 6 letters to show you how to get started.
|
Strand #1 |
C T T |
G A C |
A A A |
G T T |
G A G |
G C T |
|
|
|
|
|
|
|
|
|
Strand #2 |
G A A |
C T G |
? ? ? |
? ? ? |
? ? ? |
? ? ? |
Hint: A always pairs with T (through two hydrogen bonds) and G always pairs with C (through three hydrogen bonds).
Time for transcription (DNA to RNΑ). The diagram below shows you how transcription works in cells.

"Transcription" by Khan Academy. Note: All Khan Academy content is available for free at (www.khanacademy.org)
Your challenge is to use the DNA strand you found in Step 1 (strand #2) to find the corresponding RNA strand.
Important: In RNA, there is no T. Instead, A pairs with U (uracil), a slightly different molecule. Like before, we found the first 6 letters to get you started.
|
DNA #2 |
G A A |
C T G |
? ? ? |
? ? ? |
? ? ? |
? ? ? |
|
|
|
|
|
|
|
|
|
RNA |
C U U |
G A C |
? ? ? |
? ? ? |
? ? ? |
? ? ? |
Hint: In RNA, A pairs with U. G still pairs with C.
Time for translation (RNA to amino acid chains)!
You might have noticed that we have grouped the nucleobases (A, T, U, G, C) in DNA and RNA into groups of three. That is because in cells, these groups of three nucleobases (called codons) correspond to specific amino acids, which are added one after the other to form a polypeptide chain.
Part A: Use the table below to find the three letter amino acid code for your full RNA sequence found in Step 2 (e.g. Ser-Thr-Phe for UCU-ACG-UUU).

|
RNA |
C U U |
G A C |
? ? ? |
? ? ? |
? ? ? |
? ? ? |
|
|
|
|
|
|
|
|
|
Amino acid |
Leu |
Asp |
? ? ? |
? ? ? |
? ? ? |
? ? ? |
Part B: Use the diagram below to find the one letter code for the amino acids you found in Part A (e.g. S-T-F for Ser-Thr-Phe). Notice anything similar in their molecular structures?

|
Amino acid (3 letters) |
Leu |
Asp |
? ? ? |
? ? ? |
? ? ? |
? ? ? |
|
|
|
|
|
|
|
|
|
Amino acid (1 letter) |
L |
D |
? |
? |
? |
? |
Congratulations!
The amino acid sequence you have just discovered is part of the SARS-CoV-2 spike protein! (https://berthub.eu/articles/posts/reverse-engineering-source-code-of-the-biontech-pfizer-vaccine/)
FOOD FOR THOUGHT
- Check out this video by Amoeba Sisters if you'd like to know more about protein synthesis (https://www.youtube.com/watch?v=oefAI2x2CQM)!
Encode a message for friends or family using this diagram of DNA nucleobases!
Remember to send them the encoding wheel so they can decode your message.
Step 1: Write down the words you want to encode.
Step 2: Find a letter in the blue shell.
Step 3: Find the corresponding 3 nucleobase code by writing down the nucleobase from the inner yellow circle, then the grey shell, and finally the green shell (e.g. the code for the letter "U" is TAC).

Here's an example:
|
I |
M |
P |
E |
R |
I |
A |
L |
|
|
|
|
|
|
|
|
|
|
C |
A |
A |
G |
G |
C |
C |
C |
|
A |
G |
C |
T |
A |
A |
T |
G |
|
C |
T |
C |
C |
C |
C |
C |
G |
Let us know what you've encoded in the "Let's discuss" tab!
Part II: Kitchen Science!
Now that we've seen how proteins are made, let's find out how they're destroyed...
As discussed already in the Introduction, you can think of a cell as a very complicated factory: everything inside the cell has an important job! There are workers that read the instructions for that day and plan how to do them, other workers that break down the information into smaller tasks, and workers that carry out the individual tasks.
Sometimes, some of the tasks sent to the cell factory involve the creation of new proteins. This quite often involves DNA. DNA is very very small, and cannot be seen by the naked eye. However, cells contain so much DNA that this can be extracted and combined in bulk, allowing you to see it.
In Part A of this challenge, you will explore how to extract DNA from all the different components of the cell.
Other times, tasks involve the destruction of proteins, and this can be for various reasons: for example, maybe that protein isn’t needed anymore, or maybe that protein isn’t working very well anymore. It could also be the case that the protein stores a lot of valuable information, and it will be split up into smaller sections so that the information can be processed more easily. This breakdown of proteins is called protein denaturation.
In Part B of this challenge, you will explore how to denature proteins, and what this looks like.
EQUIPMENT
- A box of strawberries with the green leaves removed
-
4 plastic bags with zip-lock
-
Detergent
-
Salt
-
Water
-
Coffee filter (double/triple-layering kitchen towel will work if you’re careful)
-
Rubbing alcohol (or any alcohol!)
-
Several cups
INSTRUCTIONS
- Put rubbing alcohol into freezer the night before to cool.
-
Make up extraction solutions:
-
A: 2 teaspoons detergent, 1 teaspoon of salt and ½ cup of water.
-
B: 2 teaspoons detergent, ½ cup of water
-
C: 1 teaspoon salt, ½ cup of water
-
D: ½ cup of water
-
-
Place strawberries into a plastic bag, seal and then crush for several minutes.
-
Split into 4 bags (~4 teaspoons of mixture) and label A, B, C, D.
-
Add extraction solution to each bag and crush for a minute – do this slowly
-
Filter each bag into a separate cup using a coffee filter (a different filter for each one)
-
Add rubbing alcohol to each cup (about same amount as strawberry mixture) – add slowly down the inside of the cup, being careful not to mix the two solutions too much.
-
Wait a minute – you should see a white cloudy mixture form above the strawberry layer. This is the DNA.
-
Try and pick up the extracted DNA using e.g. a toothpick (don't use your fingers!) Take a photo and share it with us!
FOOD FOR THOUGHT
-
What does the DNA look like? How does this relate to what you know about DNA structure?
-
Note any differences between the amount of DNA extracted using each solution – what do you think is causing these differences? What is the role of the detergent and salt? What has happened to the protein that was in the cell?
-
If you have time, try extracting DNA from bananas using extraction solution A. Which fruit do you get more DNA from? Given what you know about how DNA is packaged and stored, why do you think this is?
EQUIPMENT
-
A box of eggs
-
Several bowls
- Kettle to boil water
- Detergent
- Salt
- Baking soda
- Vinegar
INSTRUCTIONS
-
Separate an egg into the yolk and the white. There are many tutorials online on how to do this if you get stuck! One of the easiest way to do this is to crack an egg over a bowl and gently separate the halves. Let the egg white out but keep the yolk in the egg shell. You can then remove more of the white by slowly and gently transferring the yolk across from one half to the other, letting the white fall into the bowl during transfers.
-
Boil some water and add this to a pot on the stove - be careful not to burn yourself! Ask an adult to help you with this.
-
Add the egg white to this and wait a few minutes. What is happening? How is this changing?
-
Once you see no further change, remove the egg white and put it in a clean bowl to cool. Once cool, compare the texture of the boiled egg white to how it was before. How has this changed?
-
Separate a few more eggs and put these in separate bowls. Then, have a go at experimenting and seeing what different treatments do to the egg white structure! Here are a few suggestions on treatments you could do to your egg whites (if you don't see any changes, try adding in a bit more!):
-
Place egg whites in the freezer overnight
-
Add detergent (1 teaspoon)
-
Add salt (1 teaspoon)
-
Add vinegar (1 teaspoon)
-
Add baking soda (1 teaspoon)
-
-
You can also have a go at combining several of the above treatments to see if you get different results. Take a photo of the treatment which changes the structure the most and share it with us!
FOOD FOR THOUGHT
-
Which treatment changed the egg white structure the most? Why do you think this is?
-
What would happen if you did these experiments with the egg yolk instead of the white? Would you see the differences as clearly? If not, why do you think this is?
-
What do you think would happen if you mixed the eggs first and did these experiments on a mixture of egg white and yolk?
- What else is there in a cell apart from DNA and proteins? What do all these different parts do?
- Do all the cells in our body look the same and do the same thing? If not, why?
- Are plant cells the same as human cells? If not, how are they different?
- The topic of cells might seem like 'biology' to you. Why might it be important for chemists to understand cell structure as well?
Part III: Visualising Proteins!
You have learnt in Part 1 where proteins come from, and in Part 2 how they can break down. In Part 3, we will talk about how proteins function.
- There are estimated to be 80,000-400,000 different proteins in the human body, and they are all important for different reasons.
- Some proteins have structural roles and carry molecules around the cell, like the motor protein seen in the animation below.

- Other proteins act as gatekeepers to allow ions to flow in and out of cells – this is important for communication between cells.
- There are also proteins whose movement is involved in the contraction of muscles.
We will look a little more into how proteins function in a moment, but first let's consider how do all these proteins carry out their different roles?
- The answer… proteins have different structures and these structures allow for different functions. Each protein folds into a structure perfectly suited for its role.
Example 1: The kinesin motor protein
- The kinesin motor protein uses a chemical reaction to generate a force.
- This force allows the protein to “walk” along actin superhighways in the cell.
- The kinesin motor protein acts as a shuttle to carry cargo around the cell, as you can see in the GIF.

Since the 1950s, scientists have been able to determine the structure of proteins using experimental methods. Thanks to the spread of computers, it is now also possible to visualise the 3D structure of proteins at home!
For example, the kinesin motor protein in the animation has a 3D structure as follows:

There are several ways of viewing the protein, for example the 3D structure can be displayed in these different ways:

(We will have a go at visualising proteins using these representations ourselves later on!)
Example 2: Ion channels
Another protein with an interesting structure is the barrel-shaped ion channel.
- This is a type of protein that sits on the cell membrane and acts as a gatekeeper.
- The shape of this protein is important since the barrel shape allows it to regulate the entrance and exit of ions
- Ions are positively or negatively charged molecules and atoms, such as the positive sodium ion Na+, or the calcium ion Ca2+
- Regulating ion flow in this way acts as a type of signal and is important for communication between cells, such as in the brain and nervous system

Image Attributions:
https://web.archive.org/web/20081215222914/http://multimedia.mcb.harvard...
RSCB PDB
We just learned that the structure of proteins is crucial in allowing them to carry out their roles in the body.
- The shape of proteins also allow them to bind with various small molecules - known as ligands - and charged molecules known as ions. These small molecules are crucial in regulating protein function, and can act as switches to stop & start different behaviour!

- However – proteins will not bind to any small molecule, but only those that have a structure complementary to the protein. In the same way that we use a key to fit in a specific lock, proteins only bind to ligands with a specific shape.
Example 3: The H-Ras GTPase protein
Don't worry about the long-sounding name of this protein! But lets have a look at its 3D structure:

And now how it looks with additional molecules bound to its surface:

You can see that the ions and ligands bind in specific places on the protein. These binding locations are important to allow the protein to alter its activity.
Take-home points:
- Different proteins have specific and unique structures
- Proteins are able to carry out their jobs depending on what they bind to
- If we can understand how small molecules bind to proteins, and how they interact with the protein structure, we can understand how proteins function. This in turn can help us to research diseases where proteins have stopped working properly
- This understanding of protein structure & function can also help us to design new molecules to interact with proteins and regulate their function – in fact, this is the basis of most medicines!
Image Attributions:
Photo by Isabella and Zsa Fischer on Unsplash
In Task 1, let’s explore the shape of proteins using the Protein Data Bank.
The Protein Data Bank (PDB) is a collection of known protein structures. It allows proteins to be viewed in 3D, and here is where Challenge 3 begins
- Navigate to the PDB homepage at: https://www.rcsb.org/
- Each protein is given an “ID” that allows us to find it in the database
- Let’s begin with the barrel-shaped green fluorescent protein – this has the ID “5B61”
- In the search bar, type “5B61”

-
5B61 will appear -> now you can select “3D View -> Structure” to take you to the 3D Viewer

-
Have a go at interacting with the 3D viewer to explore the shape of the protein!
-
You can use the mouse to change the view - for example, zoom in & out using the mouse scroller, or move the whole protein by clicking on the protein with both left & right buttons and dragging left or right.

- Can you change the viewing angle so it matches below? (Hint: you can left-click and drag to change the view)
- Now you can see inside the ion channel, and the shape of the barrel is more clear:

-
You can also change how the protein shape is represented using the "Polymer" tab - first, select the three little dots:

- Then choose the "Add Representation" button:

- Now you can choose different representations, like we saw with the kinesin motor protein earlier.
- Try to change to a "Ball & Stick" or "Spacefill" Model (Hint: you will need to delete the previous representation by using the little bin button)

- Can you make the Ball-and-Stick model like below?

- How about the Spacefilling model like below?

- What are the main differences between these representations? Which one do you think is most accurate in showing what the protein really looks like?
-
Other proteins with interesting shapes include those shown below - try visualising these using their 4-letter PDB IDs

In Task 2 we will use the Protein Lens website to see how small molecules affect protein function.
- Protein Lens was developed by the Yaliraki Group at Imperial College London. Anyone can use this software to model proteins and the interactions between proteins and molecules that they bind to.
- Using this software, we can understand the relationship between a protein’s structure and the ligands bound.
- Now you know how to load and view a PDB file, we will be using these again in Protein Lens!
Let's begin..:
- Navigate to the Protein Lens homepage at: https://www.proteinlens.io/webserver/index
- Select "Jump In" to begin!

- We will once again be looking at the H-Ras GTPase protein, with PDB ID "3K8Y", so go ahead and type that into the left-hand box, then click "GET PDB":

- You can keep the "Structural Settings for Graph Construction" as the default, and simply click "Construct Graph"

- You will then need to fix the representation of the protein so it gives you one structure, as follows:
- First, click "Quick Fix", then "NEXT"
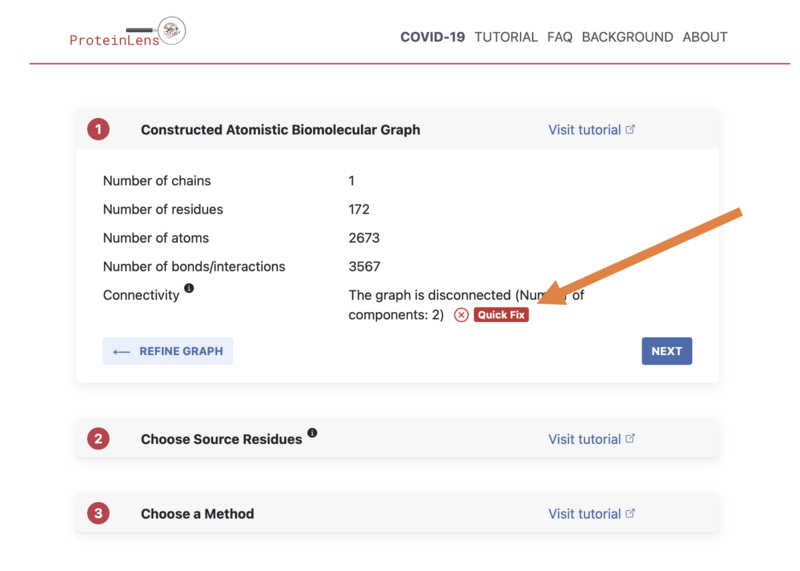
- Select the first option (the "1st largest component"), then click "SELECT COMPONENT & RE-CONSTRUCT GRAPH":

- Next you need to choose where on the protein to start the calculations from - we will select the location where the ligand binds on the protein surface
- First choose "Select a ligand":

- Then select the GNP ligand as shown in the image:

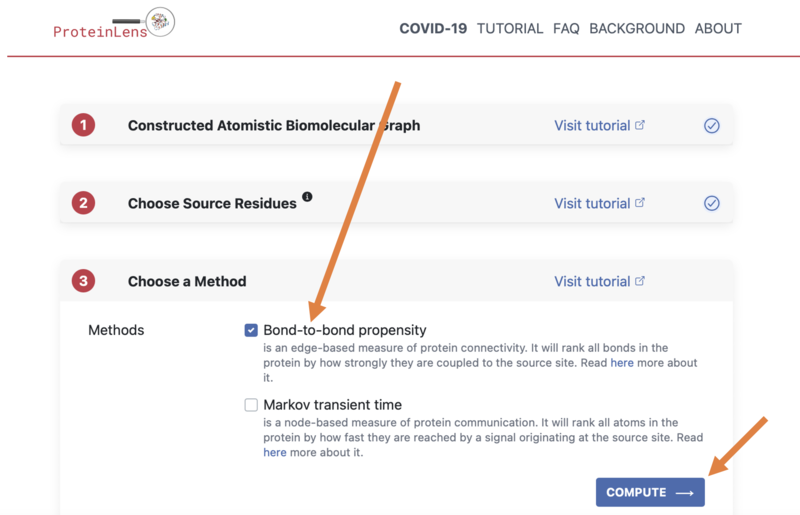
- The final set-up step is to choose our Method - we will just run "Bond-to-bond propensity"
- (This is a mathematical model of how all the atoms in the protein are joined together)
- Then click "COMPUTE" and allow the results to load (this may take a few seconds)
- Once the method has run, we will look at the results for "Bond-to-bond Propensity", displayed in 1B:

Try toggling the slider on the right-hand-side and seeing different parts on the protein become highlighted in red.
When you move the slider to 0.99, only the parts on the protein that are most correlated to the source are shown. This means that these parts of the protein are most affected when anything binds at the source location that we chose earlier (we chose the GNP ligand as the location).
Though this may seem a little abstract at first, what this shows is the influence of binding sites on different parts of the protein. It is a little bit like when something on social media goes viral - depending on the start point, a social media post may be shared to different places. But if there are social media influencers, shares from these people will strongly affect the spread of the post (these can be considered like the red parts of the protein shown at 0.99).
To-do:
- Look at the right-hand-side diagram in 1B – where on the protein is highlighted with a cut-off at 99%?
- Have a look at the protein structure using the PDB databank – can you see anything interesting at this point?
Here is an image of the protein with the GNP ligand molecule and ions bound to give you a clue:

What the red parts of the protein on Protein Lens show us, is the regions of the protein that are most affected when the GNP ligand binds.
We can see that these red regions correspond to other binding sites on the protein - the binding sites of ions.
Let's discuss!

Celebrate!